Wireless@Bolton - Connecting to CampusRoam
 To set up CampusRoam in Windows XP
These instructions apply only if you are using Windows to manage your wireless network connection.
If your laptop has its own configuration wizard (ie. Dell), you'll need either to switch this off or follow the more general instuctions below.

- Click on the
 Wireless Network connection icon in the notification area, to get the Network Connections Dialog box:
- Click "Change the order of preferred networks" on the left of this window.

- Click the Add... button and type CampusRoam into the Network Name field.
- Set the Network Authentication type to WPA2 and Data Encryption to AES.

- Click on the Authentication tab.
- Set the EAP Type to Protected EAP (PEAP)
- Make sure the other two checkboxes are unticked. Then click the Properties button.

- In the Protected EAP Properties Window, untick the Validate Server Certificate checkbox and click the Configure... button.
- In the EAP MSCHAPv2 Properties box, untick the checkbox.
- Although it's not shown ticked here, you can tick the Enable Fast Reconnect box.
- Click OK to all open properties dialog boxes.

- Back at the Wireless Network Connection window, double-click on CampusRoam to connect to it.
- You'll see a small popup in the notification area (bottom right). Click on this to enter your university username and password.
- Enter the domain as bolton.ac.uk. Click OK and you should be connected to CampusRoam.
To set up CampusRoam on a Mac

- Enable Wi-Fi on the Finder top menu bar.

- Select the CampusRoam network

- You will be asked for your credentials. Enter your normal university username and password.
- Select the 'Remember this network' check box to make your device connect automatically in future.
- Click Join
To set up CampusRoam on Vista or Windows 7
1. Configuration

- Right-click on the wireless network icon in the notification area and click on Connect to a network
- At the bottom of this window, choose Set up a connection or network
- Choose Manually connect to a wireless network, then click Next.
- Enter the relevant information as seen on the right:
Network name: CampusRoam
Select Security Type: WPA2-Enterprise
- Click Next.
At the next screen, click Change network settings. A Properties box will then pop up.

- Choose the Security Tab.
- Set the network authentication method to Protected EAP (PEAP)
- Click the Settings... button

- Untick validate to server certificate
- Select Authentication Method: Secured password (EAP-MSCHAP v2)
- Then click the Configure ... button.
- Untick the "Automatically use my Windows logon name and password (and domain if any)" box, and click OK.
- Click OK to the Protected EAP Properties window, and OK to the CampusRoam Wireless Network Properties window.
- Click Close to the main window. That completes the configuration.

- In the notification area, you should see a message saying, "Additional information is required to connect to CampusRoam." Click on this
- Enter your university username and password in the Enter Credentials box and click OK.
- You should then be connected to CampusRoam.
To set up CampusRoam on a Nokia Smartphone
This page includes screenshots from an N95, but other Nokia phones with WiFi will be very similar.
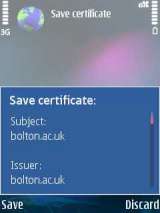
- You can connect to CampusInfo and navigate to this page to click on the link above, or download the certificate to your PC and transfer it to your phone
- Whichever method you use, be sure to click on the certificate on your phone and click Save
Step 2: Define Access Point on your phone
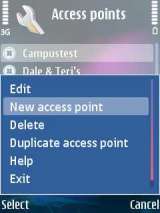
- In Tools->Settings->Connection, go to Access Points to Define a new Access point
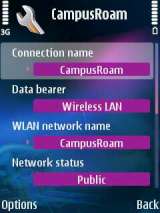
- Change the New Access Point settings to match those pictured
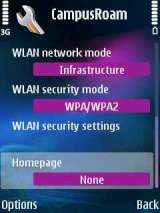
- Once these are set, go to WLAN security settings, and click Options - Edit
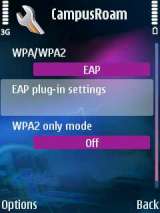
- Change WPA/WPA2 to EAP, and edit the EAP plug-in settings.
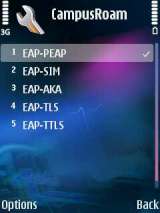
- Enable EAP-PEAP, and disable the other methods
- You can bring EAP-PEAP to the top, but this is not necessary.
- Click Options->Edit on EAP-PEAP
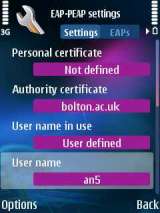
- In the EAP-PEAP settings, change the Authority Certificate to bolton.ac.uk (the certificate you downloaded earlier)
- Change User name to User defined, and enter your username here
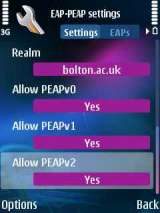
- Change realm to User defined, and set this to bolton.ac.uk
- Change 'Allow PEAPv2' to Yes
- Click right to enter the EAPs tab
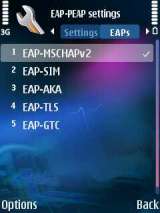
- As before, make EAP-MSCHAPv2 the default
- Click Options-Edit on this
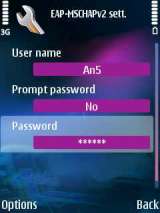
- Enter your username and password here
- Click Back repeatedly, until you have finished the Settings Screen
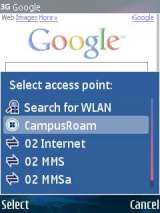
- You should now be able to select CampusRoam as one of your Access Points, and browse the internet
To set up CampusRoam on an iPhone

- Turn Wifi On
- Click on CampusRoam

- You will be asked for your credentials. Enter your normal university username and password.
- Click Join

- Accept the certificate from "Homer.bolton.ac.uk"

- Your connection to CampusRoam is now set up.
- Sit back and enjoy your cup of tea.
To set up CampusRoam on an Android device

- Enter settings - Wireless and Networks
- Turn on Wi-Fi, then click Wi-Fi Settings
- Under Wi-F networks, click on eduroam to start configuring settings

- Scroll down in the 'Connect to eduroam' box and put your username in the Identity box.
- You'll need to put username@bolton.ac.uk
- Type your password in the Wireless password box.
- Click Connect

- Your connection to eduroam is now set up.
- Your phone should connect within a few seconds.
Setting up Campus Roam on other systems
Related Links


